WorkingInT2BCloud: Difference between revisions
| (4 intermediate revisions by the same user not shown) | |||
| Line 47: | Line 47: | ||
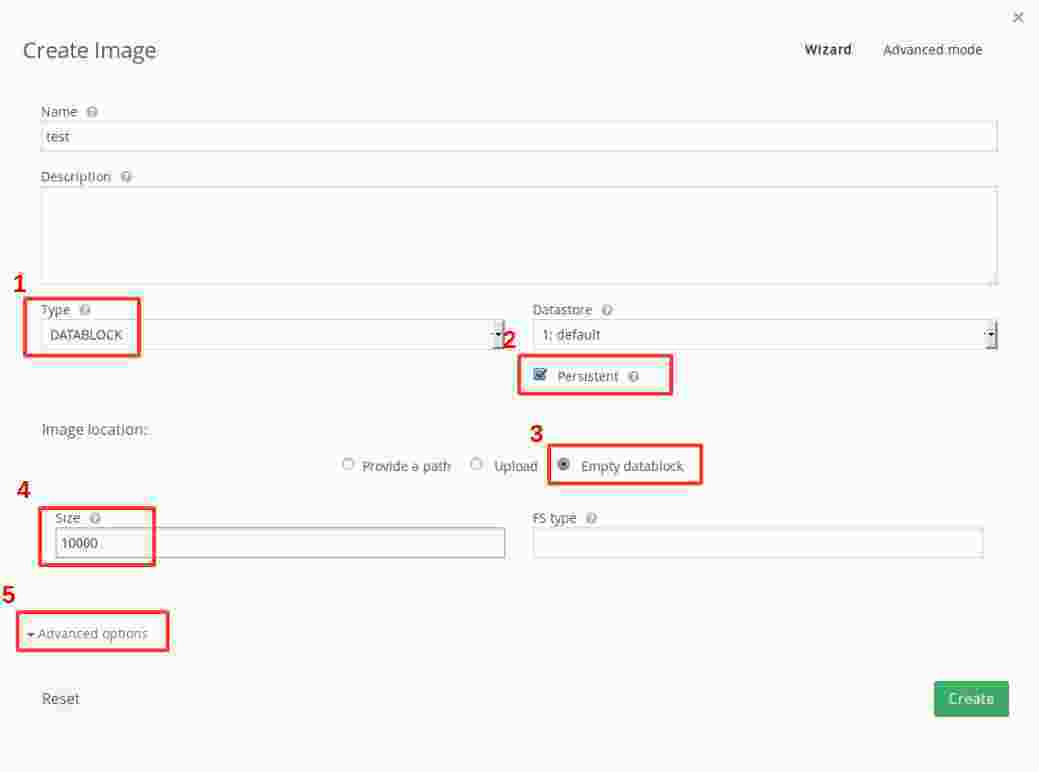
#Disk size in MB | #Disk size in MB | ||
#Enable the advanced option to go to the next screen. | #Enable the advanced option to go to the next screen. | ||
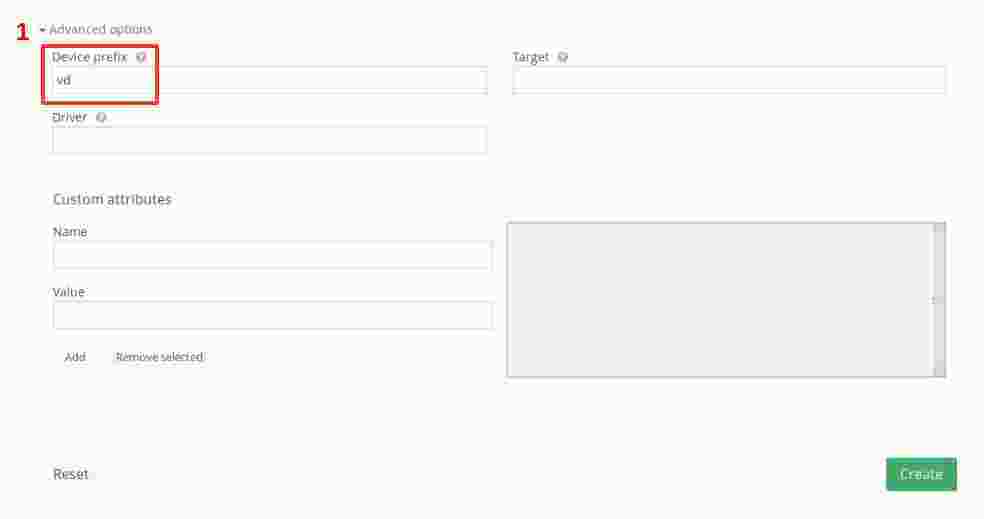
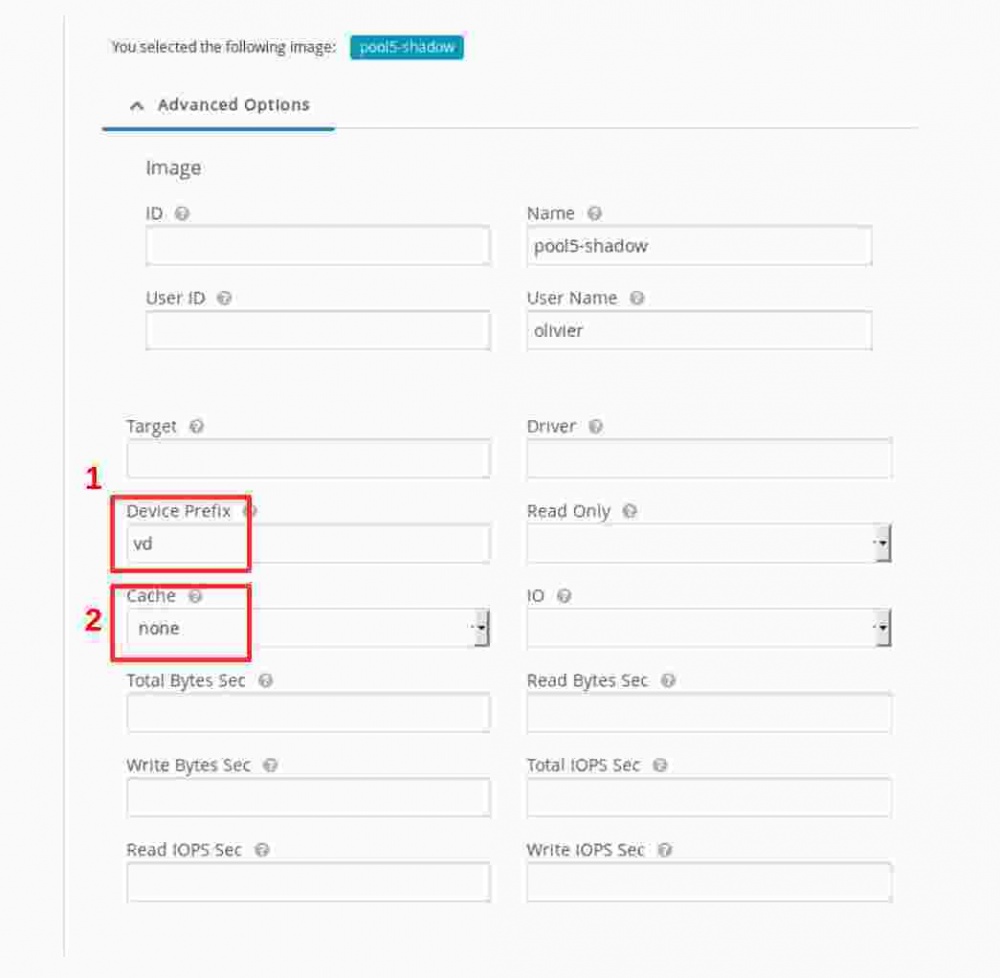
[[File:Advanced_disk_opennebula.jpg]] | [[File:Advanced_disk_opennebula.jpg|1000px]] | ||
Set the device prefix to “vd”. This will enable the virtio driver (otherwise VM performance are very poor). | Set the device prefix to “vd”. This will enable the virtio driver (otherwise VM performance are very poor). | ||
| Line 69: | Line 69: | ||
===== Template: Storage ===== | ===== Template: Storage ===== | ||
[[File:Create_template_disk_opennebula.jpg]] | [[File:Create_template_disk_opennebula.jpg|1000px]] | ||
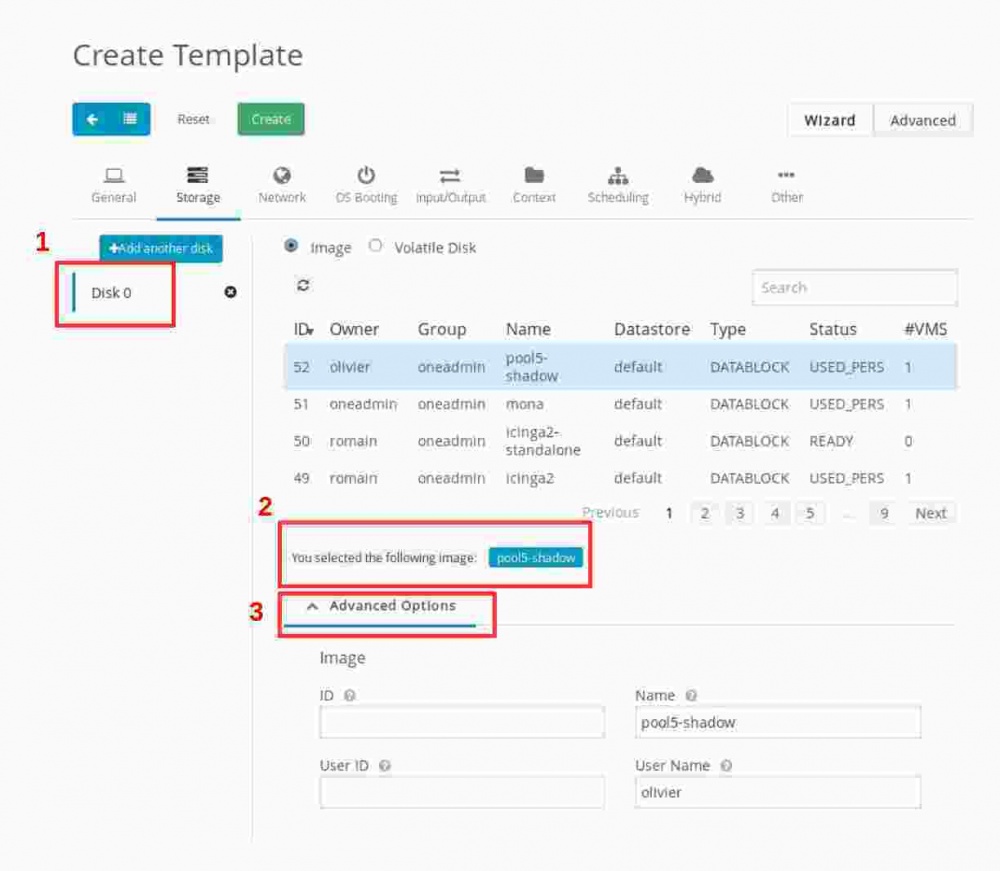
# “Disk 0” is created automatically as a default, but... | # “Disk 0” is created automatically as a default, but... | ||
| Line 75: | Line 75: | ||
# Display the advanced options | # Display the advanced options | ||
[[File:Create_template_disk_2_opennebula.jpg]] | [[File:Create_template_disk_2_opennebula.jpg|1000px]] | ||
# Again, set the device prefix to “vd” to enable virtio driver for better performances. | # Again, set the device prefix to “vd” to enable virtio driver for better performances. | ||
| Line 82: | Line 82: | ||
===== Template: Network ===== | ===== Template: Network ===== | ||
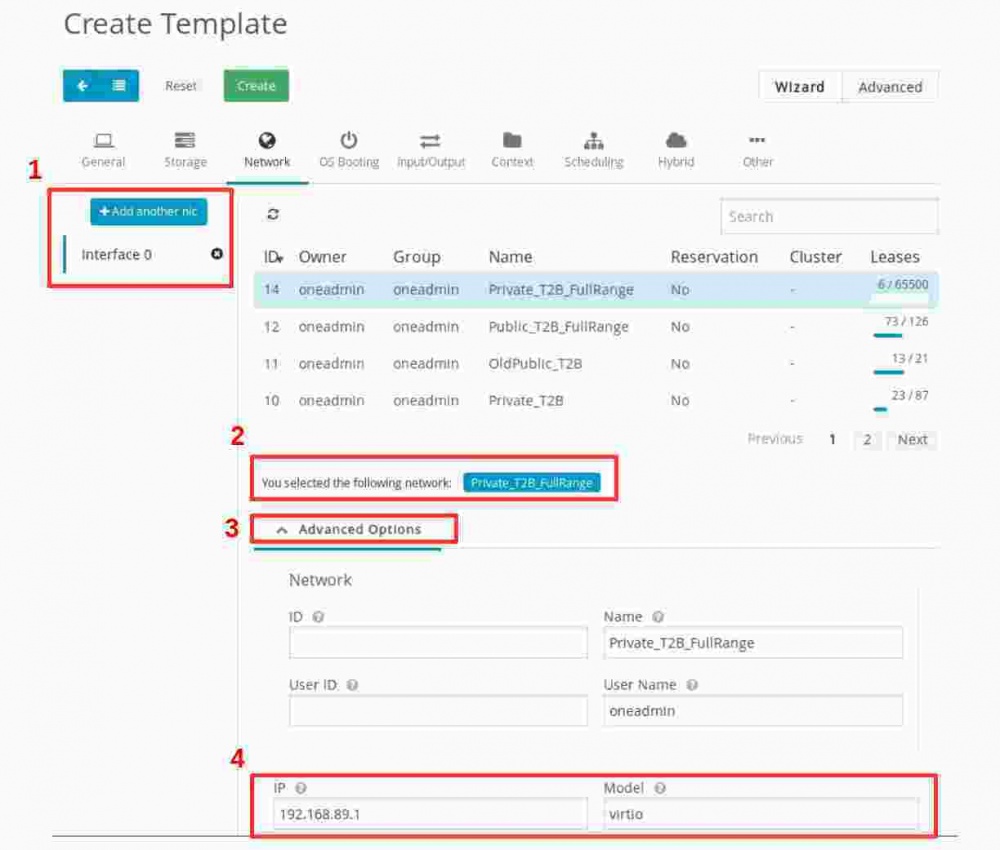
[[File:Create_template_network_opennebula.jpg]] | [[File:Create_template_network_opennebula.jpg|1000px]] | ||
# By default, “interface 0” is automatically created. Click on the blue button “Add another nic” if you need more network interfaces. | # By default, “interface 0” is automatically created. Click on the blue button “Add another nic” if you need more network interfaces. | ||
# For each nic created in the previous step, select the virtual network in the above table. | # For each nic created in the previous step, select the virtual network in the above table. | ||
## The usage in the T2B is to place the first nic in the public network (Public_T2B_Fullrange) | |||
## And the second nic in the private network (Private_T2B_Fullrange). | |||
# Display the advanced options (see next slide for explanations). | # Display the advanced options (see next slide for explanations). | ||
# Set the IP addresses of the nics (don't forget to do it for all the nics defined in the previous step !). The model should be “virtio” for better performances. | # Set the IP addresses of the nics (don't forget to do it for all the nics defined in the previous step !). The model should be “virtio” for better performances. | ||
===== Template: OS Booting ===== | |||
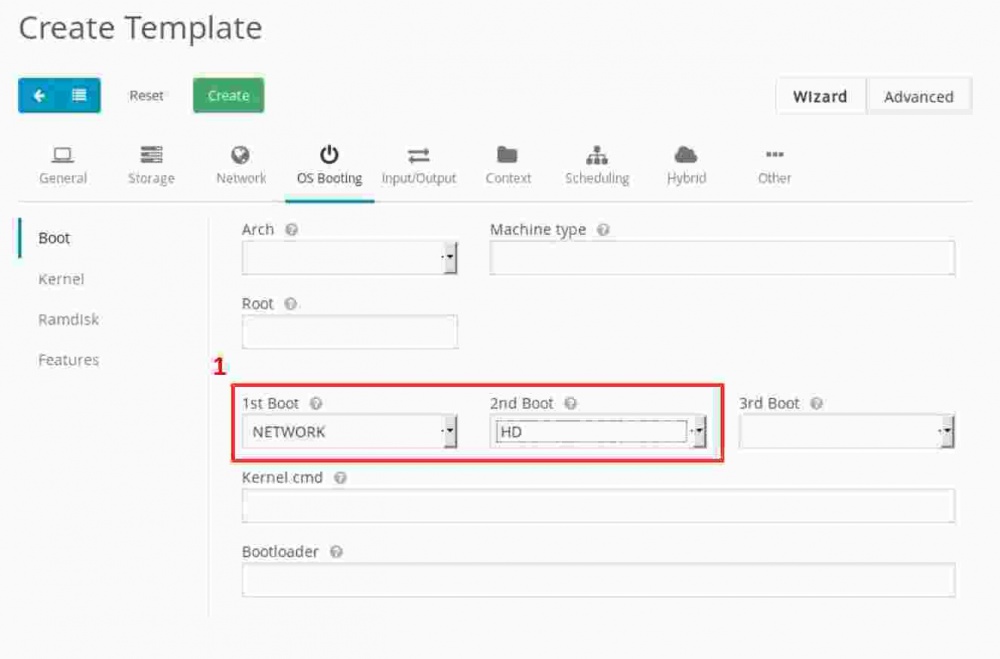
[[File:Create_template_booting_opennebula.jpg|1000px]] | |||
If you want to install the machine with Quattor, it is very important to choose the network as the first boot device, and the hard drive as the second one. | |||
===== Template: IO ===== | |||
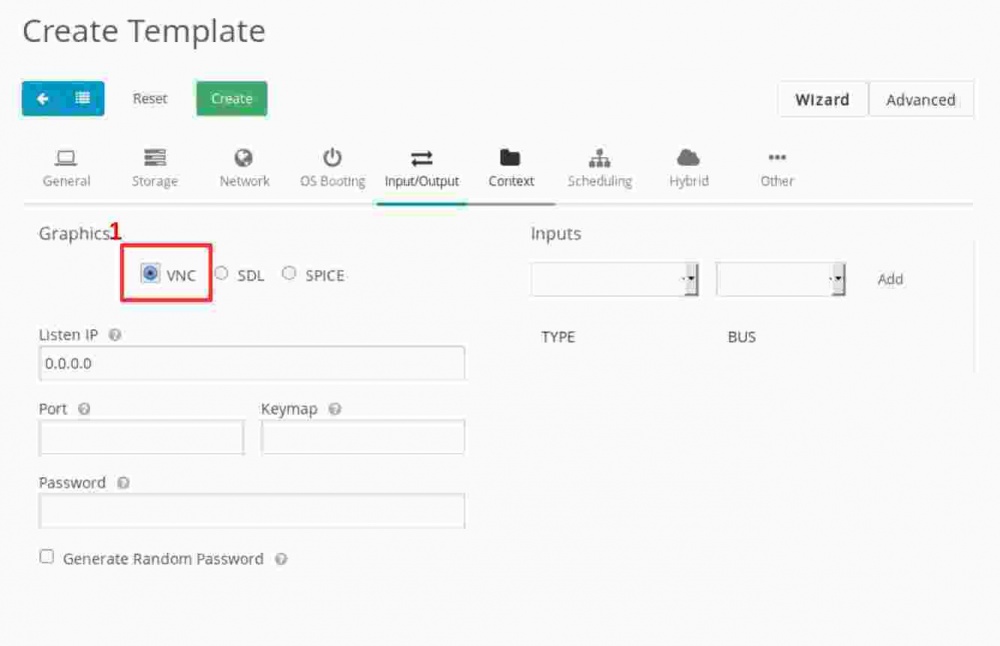
[[File:Create_template_IO_opennebula.jpg|1000px]] | |||
Choose “VNC” to be able to interact with your VM. | |||
===== Template: Context ===== | |||
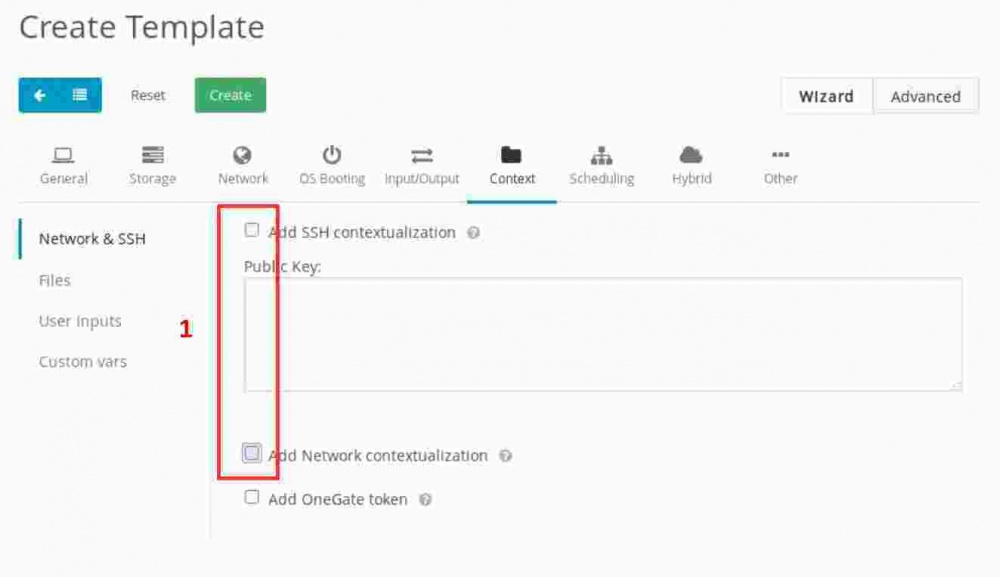
[[File:Create_template_Context_opennebula.jpg|1000px]] | |||
Unselect the contextualization check-boxes (we don't need it because Quattor will do the job). | |||
===== Template: Context ===== | |||
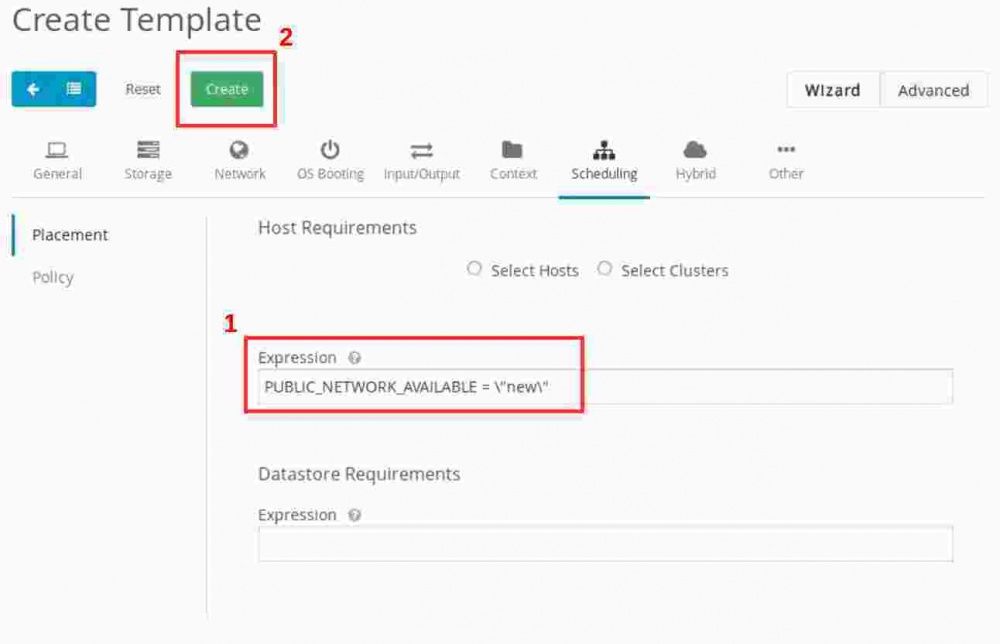
[[File:Create_template_Shedulling_opennebula.jpg|1000px]] | |||
# The scheduling is the step where OpenNebula is selecting an hypervisor to host the VM. In our T2B cloud, some hypervisors are connected to the old public network, and the others are connected to the new public network. If your VM will be in the new public network, you must tell explicitely the scheduler to choose the hypervisor accordingly. | |||
* Remark : PUBLIC_NETWORK_AVAILABLE is custom attribute that we have set for each host. Possible values are : “old” and “new”. | |||
** PUBLIC_NETWORK_AVAILABLE = \"new\" | |||
# This was the last step ! You can click on button “Create”. | |||
==== instantiate your VM ==== | |||
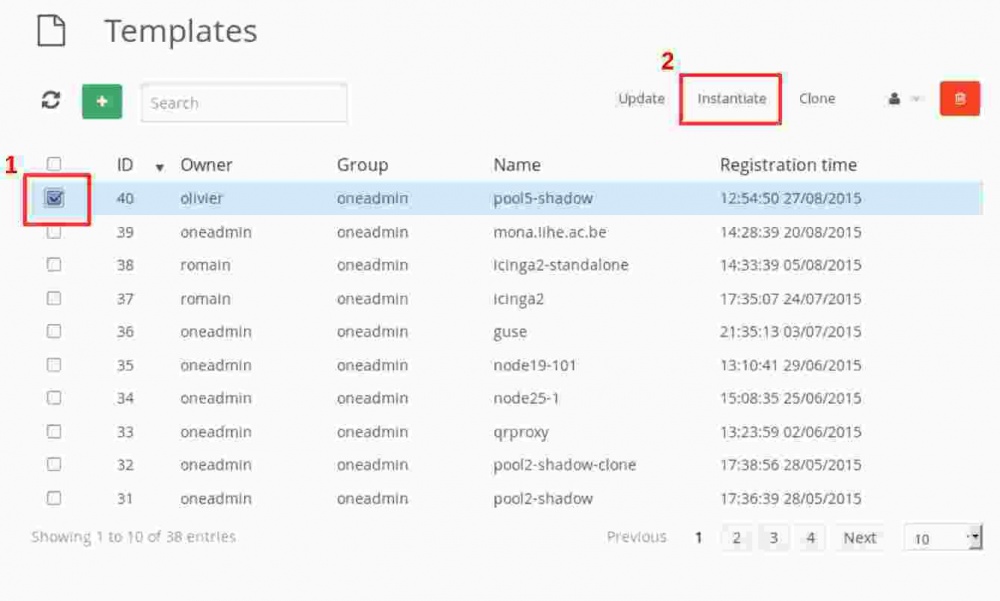
[[File:Create_Instantiate_opennebula.jpg| 1000px]] | |||
# Back to the table showing all the templates, select the newly created one and... | |||
# ...click on button “Instantiate” | |||
Latest revision as of 16:35, 1 September 2015
Golden rules
- Before starting, please read the doc
- Never, ever, change the status of a VM using virt-manager ! Do everything using Sunstone only, and nothing else !
- Admin tasks on OpenNebula : most of them requires that you become oneadmin ("su - oneadmin").
Admin tasks
How to stop OpenNebula ?
Connect as root to the front-end machine, and type the following commands :
su - oneadmin
sunstone-server stop
oneflow-server stop
econe-server stop
one stop
How to start OpenNebula ?
Connect as root to the front-end machine, and type the following commands :
su - oneadmin
one start
sunstone-server start
Using Sunstone front-end
Connecting to the Sunstone front-end
The Sunstone front-end is installed on dom02. Open a "socks" port to qnat or ccq (or configure your FoxyProxy) to connect to the the following URL :
http://192.168.10.35:9869/
You will be asked a login and a password.
Creation of VMs
To create a VM, you have to follow the following steps :
- creation of a disk
- creation of a template using the disk created previously
- instantiation of the template to create the VM
In the following explanations, we will suppose that you want to create a new VM that you want to deploy with Quattor.
Creation of the disk
- Choose type “DATABLOCK” because you just want a drive (not a CDROM iso, neither a disk with preinstalled OS).
- “Persistent” means the content of the disk image is preserved when the machine is shut down.
- You want an empty drive
- Disk size in MB
- Enable the advanced option to go to the next screen.
Set the device prefix to “vd”. This will enable the virtio driver (otherwise VM performance are very poor). Don't forget to change the disk name accordingly in the hardware template in the SCDB. For example :
'harddisks' = dict('vda', create('hardware/harddisk/sas_generic', 'capacity', 60*GB));
Next, click Create. Now your disk is ready and we can apply an opennebula template on it.
Creation of the Template
Template: General
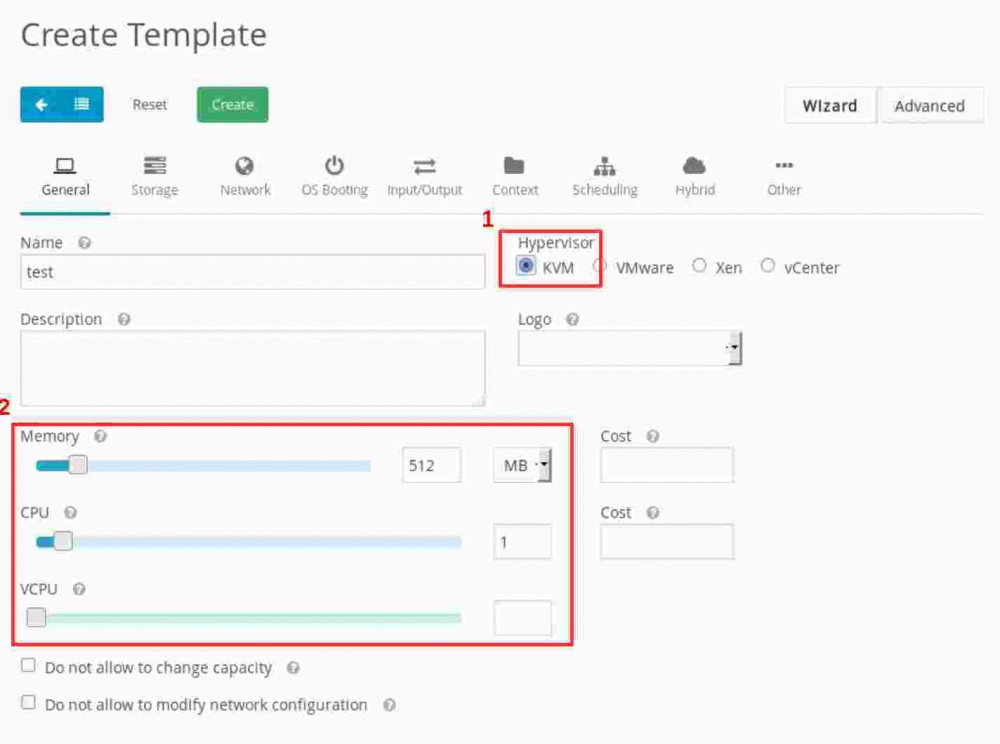
- We are using KVM hypervisors.
- VCPU should only be used if you want to “pin” some cores of the hypervisor to your VM, the result being better performances.
Template: Storage
- “Disk 0” is created automatically as a default, but...
- Now, associate it with the disk image you just created (select it in the table).
- Display the advanced options
- Again, set the device prefix to “vd” to enable virtio driver for better performances.
- Disable disk cache for better performances
Template: Network
- By default, “interface 0” is automatically created. Click on the blue button “Add another nic” if you need more network interfaces.
- For each nic created in the previous step, select the virtual network in the above table.
- The usage in the T2B is to place the first nic in the public network (Public_T2B_Fullrange)
- And the second nic in the private network (Private_T2B_Fullrange).
- Display the advanced options (see next slide for explanations).
- Set the IP addresses of the nics (don't forget to do it for all the nics defined in the previous step !). The model should be “virtio” for better performances.
Template: OS Booting
If you want to install the machine with Quattor, it is very important to choose the network as the first boot device, and the hard drive as the second one.
Template: IO
Choose “VNC” to be able to interact with your VM.
Template: Context
Unselect the contextualization check-boxes (we don't need it because Quattor will do the job).
Template: Context
- The scheduling is the step where OpenNebula is selecting an hypervisor to host the VM. In our T2B cloud, some hypervisors are connected to the old public network, and the others are connected to the new public network. If your VM will be in the new public network, you must tell explicitely the scheduler to choose the hypervisor accordingly.
- Remark : PUBLIC_NETWORK_AVAILABLE is custom attribute that we have set for each host. Possible values are : “old” and “new”.
- PUBLIC_NETWORK_AVAILABLE = \"new\"
- This was the last step ! You can click on button “Create”.
instantiate your VM
- Back to the table showing all the templates, select the newly created one and...
- ...click on button “Instantiate”
